Drawing Chess Positions
Dominus Connects
In a recent article Mark Dominus describes how he grew frustrated with his graphical editor and wrote a script to draw connectors:
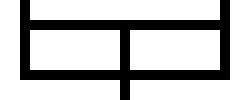
Here’s what I did instead. I wrote a program that would read an input like this:
        >-v-<
        '-+-`
and produce a jpeg file that looks like this:
I haven’t tried running the software, which, Dominus admits, isn’t his most polished. What interests me is: the way he devises a mini-language for describing these connectors, then combines hand-built and standard tools to produce the required result; and how quickly he ditches the Gimp and settles on this approach. Clearly he’s done this sort of thing before.
Chessboards Revisited
Recently I wrote about a rather easier graphics problem, of drawing chessboards. My real mission, though, was to promote scripted graphics. A chessboard would make a good starting point, I thought. I planned to go on to describe a more advanced drawing problem, of putting pieces on the board — a problem requiring more pixel bashing and more thought about inputs.
This article tackles that follow-on problem. What I didn’t realise — but really should have guessed — is that it’s a problem which has been solved many times before in many different domains. You can find LaTeX packages and emacs modes for it. There’s even a MediaWiki macro. So if you need to draw chess positions please investigate what’s already out there.
That said, the rest of this article follows on from its predecessor. We’ll settle on a suitable notation for describing chess positions and use this as a basis for creating ASCII, Unicode + CSS, and PNG graphics. We’ll also discuss the advantages of using an interpreted, dynamic language for image processing.
Program Input
Mark Dominus invented his own input notation. We needn’t. The Forsyth-Edwards notation for recording a particular board position is compact, simple and standard.
From Wikipedia:
A FEN “record” defines a particular game position, all in one text line and using only the ASCII character set. A FEN record contains six fields. The separator between fields is a space. The fields are:
- Piece placement (from white’s perspective). Each rank is described, starting with rank 8 and ending with rank 1; within each rank, the contents of each square are described from file a through file h. Following the Standard Algebraic Notation (SAN), each piece is identified by a single letter taken from the standard English names (pawn = “P”, knight = “N”, bishop = “B”, rook = “R”, queen = “Q” and king = “K”). White pieces are designated using upper-case letters (“PNBRQK”) while Black take lowercase (“pnbrqk”). Blank squares are noted using digits 1 through 8 (the number of blank squares), and “/” separate ranks.
- …
The remaining five fields store other pieces of state (whose turn it is, who can castle etc.) required for resuming a game. We’ll omit them from our input.
So, for example, we record the start position:
rnbqkbnr/pppppppp/8/8/8/8/PPPPPPPP/RNBQKBNR
Some moves later, the game might be at:
r2q1rk1/pp2ppbp/1np2np1/2Q3B1/3PP1b1/2N2N2/PP3PPP/3RKB1R
ASCII Chess Positions
The first field of the FEN record is already close to an ASCII representation of a chessboard. If we expand the digits into the spaces they represent and switch the forward slashes for newlines, then printing the resulting string gives an 8x8 text square. (By the way, I’ve fixed the chessboard size at 8 rather than make it an input parameter since the FEN notation won’t work for a board size of 10x10 or bigger.) It’s not hard to add some ASCII dividers to tart up this simple graphic.
def expand_blanks(fen):
    '''Expand the digits in an FEN string into spaces

    >>> expand_blanks("rk4q3")
    'rk    q   '
    '''
    def expand(match):
        return ' ' * int(match.group(0))
    return re.compile(r'\d').sub(expand, fen)

def outer_join(sep, ss):
    '''Like string.join, but encloses the result with outer separators.

    Example:
    >>> outer_join('|', ['1', '2', '3'])
    '|1|2|3|'
    '''
    return '%s%s%s' % (sep, sep.join(ss), sep)

def ascii_draw_chess_position(fen):
    '''Returns an ASCII picture of pieces on a chessboard.'''
    pieces = expand_blanks(fen).replace('/', '')
    divider = '+-+-+-+-+-+-+-+-+\n'
    rows = ((outer_join('|', pieces[r: r + 8]) + '\n')
            for r in range(0, 8 * 8, 8))
    return outer_join(divider, rows)
An example:
>>> fen = "r2q1rk1/pp2ppbp/1np2np1/2Q3B1/3PP1b1/2N2N2/PP3PPP/3RKB1R"
>>> print ascii_draw_chess_position(fen)
+-+-+-+-+-+-+-+-+
|r| | |q| |r|k| |
+-+-+-+-+-+-+-+-+
|p|p| | |p|p|b|p|
+-+-+-+-+-+-+-+-+
| |n|p| | |n|p| |
+-+-+-+-+-+-+-+-+
| | |Q| | | |B| |
+-+-+-+-+-+-+-+-+
| | | |P|P| |b| |
+-+-+-+-+-+-+-+-+
| | |N| | |N| | |
+-+-+-+-+-+-+-+-+
|P|P| | | |P|P|P|
+-+-+-+-+-+-+-+-+
| | | |R|K|B| |R|
+-+-+-+-+-+-+-+-+
Unicode + CSS
This means we can get a rather better picture of a chess position using nothing more than text. Note that these Unicode characters solve the internationalisation problem without the need for translators. (We will need a suitable font though!)
Here’s how we can create a dictionary which maps the FEN piece ASCII names to their HTML entity codes.
unicode_pieces=dict(
    zip("KQRBNPkqrbnp",
        ("&#x%x;" % uc for uc in range(0x2654, 0x2660))))
I’ve used this dictionary to create the block of text shown below. I’ve tried using CSS to colour and place squares on the board — sorry if it doesn’t work in your browser, I’m no CSS expert!
♜  ♛ ♜♚

♟♟  ♟♟♝♟

 ♞♟  ♞♟

  ♕   ♗

   ♙♙ ♝

  ♘  ♘

♙♙   ♙♙♙

   ♖♔♗ ♖
This image isn’t ideal: the board background is visible through the pieces, which is particularly noticeable for white pieces on dark squares. I haven’t figured out how to eliminate this flaw!
Wiki Macros
Here’s the opening chess position as a MediaWiki macro. If this seems like too much effort to type, David A. Wheeler provides an online FEN-to-Wikipedia conversion tool.
{{Chess diagram|=
| tright
|
|=
 8 |rd|nd|bd|qd|kd|bd|nd|rd|=
 7 |pd|pd|pd|pd|pd|pd|pd|pd|=
 6 |  |  |  |  |  |  |  |  |=
 5 |  |  |  |  |  |  |  |  |=
 4 |  |  |  |  |  |  |  |  |=
 3 |  |  |  |  |  |  |  |  |=
 2 |pl|pl|pl|pl|pl|pl|pl|pl|=
 1 |rl|nl|bl|ql|kl|bl|nl|rl|=
    a  b  c  d  e  f  g  h
|
}}
Python Imaging Library
The OS X filename limitation came as a nasty surprise. Most of the time I use my Mac like any other Unix box and so I naturally expected that K.png and k.png would co-reside happily in the same directory. They can’t! Apparently it’s for backwards compatibility, to keep old software alive. Yuck!
Anyway, to render a chess position using the Python Imaging Library (PIL), we’ll need some suitable pictures of the pieces. I downloaded some from Wikipedia (thanks!) It’s important these images have an alpha channel. (The alpha channel assigns an opacity to each pixel, which will be used when we compose the image with another: when we put the piece on the board, that is. Without an alpha channel, we wouldn’t see the squares underneath the pieces.)
Interacting with Images
An interpreted language comes into its own when working with an image. Here’s a session in which we open a PNG (the black king) and poke around at it to find:
- what it looks like
- its mode and size
- whether all pixels are grey
- how many transparent and opaque pixels it has
- the contents of a few pixels on the left of the image
>>> import Image
>>> king = Image.open('k.png')
>>> king.show()
>>> king.mode
'RGBA'
>>> king.size
(45, 45)
>>> pixels = king.load()
>>> def is_grey(rgba):
...     r, g, b, a = rgba
...     return r == g == b
...
>>> W, H = king.size
>>> xys = [(x, y) for y in range(H) for x in range(W)]
>>> all(is_grey(pixels[xy]) for xy in xys)
True
>>> sum(1 for xy in xys if pixels[xy][3] == 0)
1243
>>> sum(1 for xy in xys if pixels[xy][3] == 255)
612
>>> print "\n".join(map(repr, (pixels[x, 20] for x in range(10))))
(0, 0, 0, 0)
(0, 0, 0, 0)
(0, 0, 0, 0)
(0, 0, 0, 0)
(0, 0, 0, 0)
(15, 15, 15, 170)
(247, 247, 247, 255)
(148, 148, 148, 255)
(0, 0, 0, 255)
(0, 0, 0, 255)
To place this piece on top of a background image we use Image.paste. Again, we can experiment interactively.
>>> red_sq = Image.new('RGBA', king.size, 'red')
>>> help(red_sq.paste)
Help on method paste in module Image:

paste(self, im, box=None, mask=None) method of Image.Image instance
    Paste other image into region

>>> mask = king.split()[3]
>>> red_sq.paste(king, None, mask)
>>> red_sq.show()
Note that Image.show allows us to view the image using some platform dependent utility.
The details
Once we’ve figured out how to put pieces on the board using Image.paste, the rest is all details. I’ve decided to create a class for rendering chess positions. Creating a class instance pre-loads the piece graphics and sketches in the board background; each time we call draw, the background is copied and the pieces are pasted into place. The resulting image is returned directly to the client, who can choose what to do with it.
#! /usr/bin/env python
'''Code to draw chess board and pieces.

FEN notation to describe the arrangement of peices on a chess board.

White pieces are coded: K, Q, B, N, R, P, for king, queen, bishop,
rook knight, pawn. Black pieces use lowercase k, q, b, n, r, p. Blank
squares are noted with digits, and the "/" separates ranks.

As an example, the game starts at:

rnbqkbnr/pppppppp/8/8/8/8/PPPPPPPP/RNBQKBNR

See: http://en.wikipedia.org/wiki/Forsyth-Edwards_Notation
'''
import re
import Image
import ImageDraw

class BadChessboard(ValueError):
    pass

def expand_blanks(fen):
    '''Expand the digits in an FEN string into spaces

    >>> expand_blanks("rk4q3")
    'rk    q   '
    '''
    def expand(match):
        return ' ' * int(match.group(0))
    return re.compile(r'\d').sub(expand, fen)

def check_valid(expanded_fen):
    '''Asserts an expanded FEN string is valid'''
    match = re.compile(r'([KQBNRPkqbnrp ]{8}/){8}$').match
    if not match(expanded_fen + '/'):
        raise BadChessboard()

def expand_fen(fen):
    '''Preprocesses a fen string into an internal format.

    Each square on the chessboard is represented by a single
    character in the output string. The rank separator characters
    are removed. Invalid inputs raise a BadChessboard error.
    '''
    expanded = expand_blanks(fen)
    check_valid(expanded)
    return expanded.replace('/', '')

def draw_board(n=8, sq_size=(20, 20)):
    '''Return an image of a chessboard.

    The board has n x n squares each of the supplied size.'''
    from itertools import cycle
    def square(i, j):
        return i * sq_size[0], j * sq_size[1]
    opaque_grey_background = 192, 255
    board = Image.new('LA', square(n, n), opaque_grey_background)
    draw_square = ImageDraw.Draw(board).rectangle
    whites = ((square(i, j), square(i + 1, j + 1))
              for i_start, j in zip(cycle((0, 1)), range(n))
              for i in range(i_start, n, 2))
    for white_square in whites:
        draw_square(white_square, fill='white')
    return board

class DrawChessPosition(object):
    '''Chess position renderer.

    Create an instance of this class, then call
    '''
    def __init__(self):
        '''Initialise, preloading pieces and creating a blank board.'''
        self.n = 8
        self.create_pieces()
        self.create_blank_board()

    def create_pieces(self):
        '''Load the chess pieces from disk.

        Also extracts and caches the alpha masks for these pieces.
        '''
        whites = 'KQBNRP'
        piece_images = dict(
            zip(whites, (Image.open('pieces/w%s.png' % p) for p in whites)))
        blacks = 'kqbnrp'
        piece_images.update(dict(
            zip(blacks, (Image.open('pieces/%s.png' % p) for p in blacks))))
        piece_sizes = set(piece.size for piece in piece_images.values())
        # Sanity check: the pieces should all be the same size
        assert len(piece_sizes) == 1
        self.piece_w, self.piece_h = piece_sizes.pop()
        self.piece_images = piece_images
        self.piece_masks = dict((pc, img.split()[3]) for pc, img in
                                 self.piece_images.iteritems())

    def create_blank_board(self):
        '''Pre-render a blank board.'''
        self.board = draw_board(sq_size=(self.piece_w, self.piece_h))

    def point(self, i, j):
        '''Return the top left of the square at (i, j).'''
        w, h = self.piece_w, self.piece_h
        return i * h, j * w

    def square(self, i, j):
        '''Return the square at (i, j).'''
        t, l = self.point(i, j)
        b, r = self.point(i + 1, j + 1)
        return t, l, b, r

    def draw(self, fen):
        '''Return an image depicting the input position.

        fen - the first record of a FEN chess position.
        Clients are responsible for resizing this image and saving it,
        if required.
        '''
        board = self.board.copy()
        pieces = expand_fen(fen)
        images, masks, n = self.piece_images, self.piece_masks, self.n
        pts = (self.point(i, j) for j in range(n) for i in range(n))
        def not_blank(pt_pc):
            return pt_pc[1] != ' '
        for pt, piece in filter(not_blank, zip(pts, pieces)):
            board.paste(images[piece], pt, masks[piece])
        return board
This code depends on PNGs for the pieces being available in the current directory, filed under the (case-sensitive!) names: {K,Q,B,N,R,P,k,q,b,n,r,p}.png. It also requires all these PNGs to have the same dimensions. Here’s how to use it:
>>> renderer = DrawChessPosition()
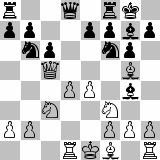
>>> fen = "r2q1rk1/pp2ppbp/1np2np1/2Q3B1/3PP1b1/2N2N2/PP3PPP/3RKB1R"
>>> board = renderer.draw(fen)
>>> board.show()
>>> board.save("%s.png" % fen.replace('/', '-'))
And here’s the resulting image (with a CSS double border):

Using a font with PIL
There is a problem with the approach taken in the previous section. We only get a good graphic if we save the returned image at its native size: scaling it up or down results in a suboptimal picture. That’s because the scaling doesn’t have enough information to go on — it has to work from a pixel raster when it really needs strokes or vector graphics.
So if we scale the linear dimensions up or down:
>>> fen = "r2q1rk1/pp2ppbp/1np2np1/2Q3B1/3PP1b1/2N2N2/PP3PPP/3RKB1R"
>>> renderer = DrawChessPosition()
>>> board = renderer.draw(fen)
>>> board.size
(360, 360)
>>> small_board = board.resize((160, 160))
>>> big_board = board.resize((640, 640))
>>> big_4_squares = big_board.crop([80, 160, 240, 320])
>>> big_4_squares.show()
>>> small_board.show()
we’ll get something like this:


The way to avoid the aliasing problems is to work directly from a stroke representation of the chess pieces; for example, by using a suitable font. Once again, PIL can do the job (though you’ll need to have installed PIL with FreeType support). I found a freely available unicode true type font and plugged it into the following code:
unichr_pieces=dict(
    zip("KQRBNPkqrbnp",
        (unichr(uc) for uc in range(0x2654, 0x2660))))

def chess_position_using_font(fen, font_file, sq_size):
    '''Return a chess position image.

    font_file - the name of a font file
    sq_size - the size of each square on the chess board
    '''
    font = ImageFont.truetype(font_file, sq_size)
    pieces = expand_fen(fen)
    board = draw_board(sq_size=(sq_size, sq_size))
    put_piece = ImageDraw.Draw(board).text
    def point(i, j):
        return i * sq_size, j * sq_size
    def not_blank(pt_pce):
        return pt_pce[1] != ' '
    pts = (point(i, j) for j in range(8) for i in range(8))
    for pt, piece in filter(not_blank, zip(pts, pieces)):
        put_piece(pt, unichr_pieces[piece], fill='black', font=font)
    return board
If we use this code to create small and large chess pictures, much as before, we’ll see something like this:

As with our CSS + Unicode picture, this image isn’t ideal since the board shows through the interiors of the pieces. And once again, I haven’t figured out how to work around this problem.
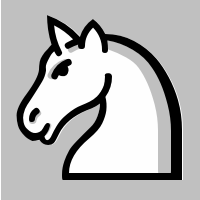
Update, 2008-03-31. A reader has worked out a cunning solution:
You can make white pieces by drawing a “black” piece in white, then overlaying that with a “white” piece in black.
I’ve given this idea a try and written up the results. Here’s the knight at square c3 — a definite improvement!
LaTeX
My thanks Ivan Uemlianin for pointing out that I’d neglected to mention LaTeX as a suitable chess position type-setter, as shown in his blog. LaTeX has been high on my list of things I really ought to learn about for well over a decade, and I simply wasn’t aware it could do this.
Conclusions
This article has shown, again, the merits of scripting graphics. We’ve also seen that an interpreted language has much to offer in this area, allowing us to query and shape images dynamically, effectively bridging the gap between our program and a GUI driven graphics package.
The Python Imaging Library has shown itself capable of working with shapes, colours, text and fonts. It’s a great tool.
We’ve not done so well at our motivating task, of drawing a chess position. As I said at the outset, if that’s why you’re here I’d suggest taking another look at the alternatives.
The subtext of this article is platform-dependence. I don’t know if the Unicode + CSS combination works in your browser or feed-reader, or indeed any other user agent; it depends on font contents and CSS rendering.
![[PNG now!]](http://www.libpng.org/pub/png/img_png/pngnow.png)
The “P” in PNG stands for “Portable”, and I would hope you can see the IMGs, which all source from PNGs — all except the off-site JPEG, another well supported format.
![[FreeType now!]](http://upload.wikimedia.org/wikipedia/en/thumb/3/3a/Freetype.png/160px-Freetype.png)
One reason I like Python and writing about Python is its platform independence. Linux, Windows, OS X etc. — we can all run the same code. For this particular application, that’s less true. For a start, you’ll need to install the non-standard PIL module. Then there’s the filename case-insensitivity (which is easy to work around, but nonetheless an embarrassment). The capabilities of PIL itself depend on the presence of other thirdparty libraries: to get you going with this article you’ll need libpng, which in turn depends on zlib, and FreeType, which again depends on zlib. On my Linux machine Image.show didn’t work until I’d installed xv from source, and that source needed some tweaking before it would build. So the code in this article is only portable once you’ve suitably prepared your platform — that is, the code isn’t really portable!